That constant drip… drip… drip… is not just annoying — it is costing you real money. A single dripping faucet can waste over 3,000 gallons of water per year, pushing your water bill up by 10–20%. The good news? You can fix it yourself in under an hour, with basic tools, and spend just $5–$20 on parts instead of paying a plumber $150–$350.
In this complete guide, you will learn exactly how to fix a leaky faucet yourself — step by step — for every common faucet type. No plumber needed!
Why Is My Faucet Leaking?
Before you grab your wrench, it helps to understand what is actually causing the drip. Most leaky faucets come down to a few common culprits:
- Worn-out rubber washers — The most common cause. Every time you turn on the faucet, the washer is pressed against a valve seat. Over thousands of uses, it wears down and stops sealing properly.
- Damaged O-rings — Small rubber rings that seal the stem of the faucet. When they crack or loosen, water seeps out around the handle.
- Corroded valve seat — The valve seat connects the faucet and the spout. Mineral deposits from water can corrode it over time, causing leaks around the spout area.
- Worn-out cartridges — In cartridge-style faucets, the cartridge controls water flow. When it wears down, dripping begins.
- Loose packing nut — Sometimes the fix is as simple as tightening one nut.
Understanding where the leak is coming from will help you fix it faster. Watch whether water drips from the spout, seeps from around the handle, or pools at the base of the faucet.
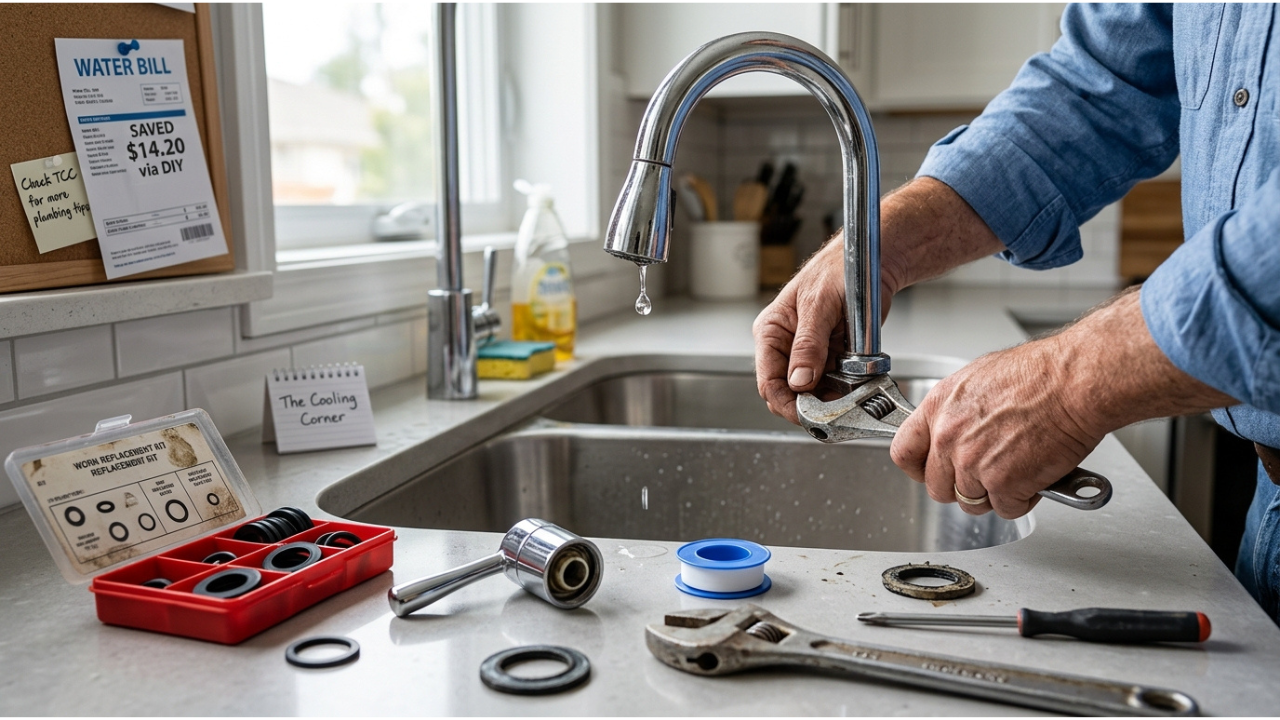
Tools and Materials You Need
You do not need a full toolbox for this repair. Here is what to gather before you start:
Tools:
- Adjustable wrench
- Flathead and Phillips screwdrivers
- Needle-nose pliers
- Allen wrench / hex key set
- Utility knife
Materials:
- Replacement rubber washers (grab an assorted pack — around $5)
- Replacement O-rings (get an assorted kit)
- Replacement cartridge (if needed — check your faucet brand)
- Plumber’s grease (also called silicone grease)
- Teflon tape (plumber’s tape)
- A small towel or rag
- A bucket or bowl
Pro Tip: Before buying parts, take a photo of your faucet brand and model number (usually stamped under the sink or on the faucet body). This helps you buy the exact replacement parts at the hardware store.
Step 1 — Identify Your Faucet Type
There are four main types of faucets, and each has a slightly different repair process. Here is how to identify yours:
| Faucet Type | How to Identify | Common In |
|---|---|---|
| Compression | Two separate handles — turn them to open/close | Older homes, utility sinks |
| Cartridge | One or two handles — smooth on/off motion | Modern bathrooms, kitchens |
| Ball | Single round handle that rotates in all directions | Kitchen faucets |
| Ceramic Disc | Single lever on a wide cylindrical body | High-end modern faucets |
Not sure which one you have? Try this: if turning the handle feels like it gets tighter as you close it — that is a compression faucet. If it moves smoothly in any direction, it is likely a ball-type. If it slides side to side, it is probably a cartridge.
Step 2 — Turn Off the Water Supply
This is the most important step before you touch anything. Skipping this will result in a very wet bathroom floor.
- Look under the sink for the shut-off valves — there should be one for hot water and one for cold.
- Turn each valve clockwise until it stops. Do not force it.
- Turn the faucet handles on to release any remaining water pressure in the line. Let the water run until it stops completely.
- Close the drain and place a towel in the sink. This prevents small parts like screws and O-rings from disappearing down the drain.
- Take a quick photo of the assembled faucet before disassembling — this will help you put it back together correctly.
If you cannot find shut-off valves under the sink, you may need to shut off the main water supply to the house. It is usually located near the water meter or where the main pipe enters the building.
Step 3 — Fix a Compression Faucet
Compression faucets are the most common type in older homes and the easiest to fix. The leak almost always comes from a worn rubber washer.
Step-by-step:
- Use a flathead screwdriver to pry off the decorative cap on top of the handle (it usually says H or C for hot and cold).
- Unscrew the handle screw underneath and pull the handle off.
- Use an adjustable wrench to loosen and remove the packing nut.
- Pull out the stem — this is the long piece that controls water flow.
- At the bottom of the stem, you will find a rubber washer held in place by a brass screw. Remove the screw and take out the old washer.
- Take the old washer to your hardware store to match the exact size, or use a washer from your assorted pack.
- Coat the new washer lightly in plumber’s grease and press it into place. Reattach the brass screw.
- Also inspect the O-ring on the stem itself. If it looks cracked or flattened, replace it too.
- Reassemble in reverse order: stem → packing nut → handle → screw → cap.
Where is the leak?
- Dripping from the spout → replace the rubber washer
- Leak around the handle → replace the O-ring or wrap the packing nut threads with Teflon tape
Step 4 — Fix a Cartridge Faucet
Cartridge faucets are found in most modern bathrooms and kitchens. The fix usually involves replacing the cartridge itself.
Step-by-step:
- Pry off the decorative cap and remove the handle screw. Pull the handle off.
- You may see a retaining clip or nut holding the cartridge in place. Remove it with pliers.
- Grip the top of the cartridge with pliers and pull it straight up and out. Note which direction it is facing before removing it — cartridges must go back in the same orientation.
- Take the old cartridge to your hardware store to find an exact match. Most major brands (Moen, Delta, Kohler) sell branded replacement cartridges.
- Insert the new cartridge in the same position as the old one. It should click or snap into place.
- Replace the retaining clip or nut, reattach the handle, and replace the decorative cap.
Pro Tip: When you reassemble and first turn the water back on, turn it on slowly. Too much initial pressure can damage the new cartridge. Let the water run for 30 seconds to flush out any debris.
Step 5 — Fix a Ball Faucet
Ball faucets have more parts than other types, which makes them slightly more complex — but still very manageable. They are common in kitchen sinks.
Because there are so many small parts, the easiest approach is to buy a ball faucet repair kit from your hardware store (usually $10–$20). It will include all the seats, springs, O-rings, and a new ball.
Step-by-step:
- Loosen the set screw on the side of the handle using an Allen wrench. Remove the handle.
- Remove the cap and collar — you may need pliers wrapped in a cloth to avoid scratching.
- Use the special tool that comes in the repair kit to unscrew the faucet cam.
- Lift out the rotating ball and inspect it. If it is cracked or pitted, replace it.
- Use needle-nose pliers to remove the seats and springs from inside the faucet body.
- Cut off the old O-rings around the faucet body with a utility knife. Coat the new O-rings with plumber’s grease before installing.
- Install all new parts from the repair kit: new springs, new seats, new O-rings, and the new ball (or your old ball if it is undamaged).
- Reassemble in reverse order, making sure all parts align correctly before tightening.
Step 6 — Fix a Ceramic Disc Faucet
Ceramic disc faucets are among the most durable and leak-resistant faucets available. When they do leak, it is usually because the ceramic disc has cracked or mineral deposits have built up on the seals.
Step-by-step:
- Push the handle back and use a screwdriver to remove the set screw. Remove the handle.
- Unscrew the escutcheon cap (the decorative cover) and remove it.
- Remove the disc cylinder — it is usually held in place by two or three screws.
- Take out the ceramic disc and inspect it for cracks. If it is cracked, it must be replaced (take it to a hardware store for an exact match).
- If the disc looks undamaged, the issue is likely buildup on the neoprene seals. Remove the seals and clean them with white vinegar or a soft cloth.
- Clean the inside of the cylinder carefully. Let everything dry completely before reassembling.
- Coat the new or cleaned seals with plumber’s grease and reinstall.
- Reassemble the cylinder, escutcheon cap, and handle.
Important: When turning the water back on after repairing a ceramic disc faucet, turn the handles to the fully open position first. Turn the water supply back on very slowly. Sudden pressure can crack the new ceramic disc.
How to Reassemble and Test
Once you have made your repair, follow these steps before calling it done:
- Reassemble all parts in reverse order of how you took them apart (this is why the photo in Step 2 is so helpful).
- Hand-tighten all nuts first, then snug them with a wrench. Do not overtighten — this is one of the most common DIY mistakes and can crack parts or cause new leaks.
- Slowly turn the shut-off valves back on (counter-clockwise).
- Open the faucet handles slowly and let the water run for 30 seconds.
- Check these three things:
- No dripping from the spout when the faucet is closed ✓
- No water seeping around the base of the handles ✓
- No water pooling under the sink ✓
If there is still a slight drip after reassembly, try gently tightening the retaining nut one more time. If the leak continues, the replacement washer or cartridge may not be the right size — revisit the hardware store with the old part.
When to Call a Plumber
Fixing a leaky faucet yourself works well in most situations, but there are times when calling a professional makes more sense:
- The faucet body itself is cracked or severely corroded
- You have no shut-off valves under the sink and cannot locate the main supply valve
- The leak is coming from the pipes, not the faucet
- You have tried the repair and the leak continues after multiple attempts
- The faucet is very old and replacement parts are no longer available
- You feel uncomfortable working with plumbing at any point
In those cases, the cost of a plumber ($150–$350) is worth avoiding further water damage to your home.
Tips to Prevent Future Leaks
Once your faucet is fixed, keep it in good shape with these simple habits:
- Do not overtighten handles when turning them off — this crushes the washers inside and causes faster wear
- Lubricate annually — once a year, remove the handles and apply fresh plumber’s grease to stems, cartridges, and O-rings
- Clean aerators every 3–6 months — mineral buildup in aerators puts extra pressure on internal seals
- Address hard water — if you have hard water, consider a water softener or filter; mineral deposits are one of the biggest causes of faucet wear
- Fix drips early — a small drip is a $10 fix. Ignoring it can lead to a corroded valve seat, which is a $60–$100 fix (or more)
FAQs
How long does it take to fix a leaky faucet yourself? Most repairs take 30 minutes to 1 hour for a first-timer. Once you have done it once, the same repair takes 15–20 minutes.
How much does it cost to fix a leaky faucet yourself? Parts typically cost $5–$20. A full ball faucet repair kit is around $10–$20. Compare that to a plumber’s visit which averages $150–$350.
Can a leaky faucet fix itself? No. Faucet leaks are caused by physical wear on rubber and metal parts. They will only get worse over time, never better on their own.
What if my faucet still leaks after I replace the washer? The most likely causes are: the replacement washer is the wrong size, the valve seat is damaged and needs replacing, or there is a worn O-ring further up the stem that you missed.
Is it better to repair or replace a leaky faucet? For most faucets under 15–20 years old, repair is the better choice. If your faucet is old, heavily corroded, or you want a style upgrade, replacement makes more sense.
Can I fix a leaky faucet without turning off the water? No — always turn off the water supply first. Working on a faucet with the water on will make a significant mess and can damage your home.
Final Thoughts
Fixing a leaky faucet yourself is one of the most rewarding and practical home repairs you can learn. With a few basic tools, under $20 in parts, and about an hour of your time, you can stop that annoying drip, save thousands of gallons of water, and avoid a hefty plumber’s bill.
The key is to identify your faucet type, take it apart carefully, replace the worn part, and reassemble it correctly. Follow the steps in this guide, and you will have a leak-free faucet before the day is out.
Have questions about your specific faucet type? Drop them in the comments below — we are happy to help!